
Table of Contents
NodeMCU is Lua based firmware of ESP8266. Generally, ESPlorer IDE is referred for writing Lua scripts for NodeMCU. It requires to get familiar with ESPlorer IDE and Lua scripting language. There is another way of developing NodeMCU with a well-known IDE i.e. Arduino IDE. We can also develop NodeMCU applications using Arduino development environment. This makes things easy for Arduino developers than learning new language and IDE for NodeMCU.
Let’s see about setting up NodeMCU with Arduino IDE . This is the first part of a tutorial series on NodeMCU. In this post I’ll show you how to install the NodeMCU and ESP boards.
Prerequisites: Install Arduino IDE
First Download Arduino IDE (version 1.6+) from the below link and install it
https://www.arduino.cc/en/Main/Software
Now that Arduino is installed, let’s move on to install the ESP boards manager.
Install ESP boards in Arduino
NodeMCU is based on the ESP8266 WiFi module. Hence, to program NodeMCU in the Arduino IDE, we need to install the ESP board manager.
- Open Arduino IDE
- Go to File -> Preferences

- Now on Preference window, Enter below link in Additional Boards Manager URLs:
http://arduino.esp8266.com/stable/package_esp8266com_index.json

- Now close Preference window and go to Tools -> Board -> Boards Manager

- In Boards Manager window, type “esp” in the search box, esp8266 will be listed there below. Now select latest version of board and click on install.

This will take from a few seconds to few minutes to install based on your internet speed.

- Once installation is complete, you can see the “Installed” as shown below:

It’s now time to test the board.
Testing the NodeMCU installation:
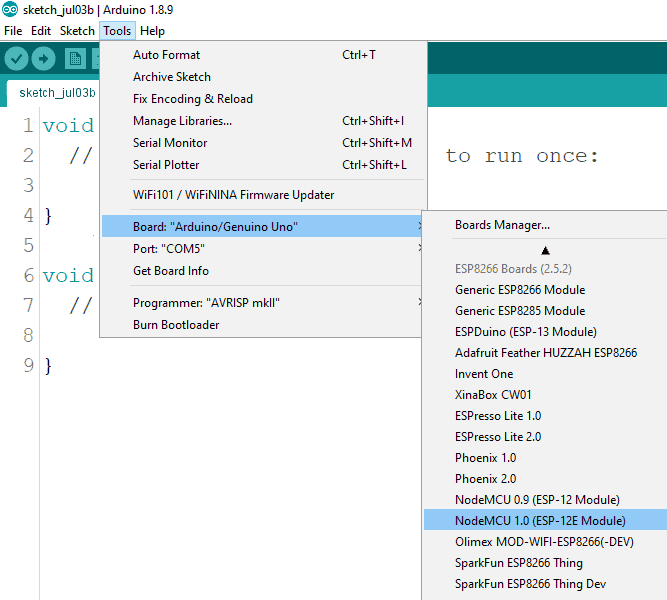
- Create a new sketch in Arduino and select the NodeMCU 1.0 board from boards as shown below
- Connect the NodeMCU to the USB port via a USB Cable
- Select the COM port

- Click on Upload
If the program uploads successfully, it means that the NodeMCU is installed properly. The program won’t do anything as we have not written any instructions. We are just checking the installation.
Once installed successfully, you might be interested in learning and trying out few NodeMCU projects
NodeMCU to AWS IoT service
The ESP8266 SPIFFS File System – Complete Beginner Guide
Hi, I’m Vivek, a Senior Embedded Innovation Specialist. I have been working on Embedded Systems and IoT for the past 11 years. I love to share my knowledge and train those who are interested. Nerdyelectronics.com was started out of this interest. You can read my full profile in this link.


 Update in ESP8266")

