Table of Contents
OTA (Over the Air) update is the process of loading the firmware to ESP module using Wi-Fi connection rather that a serial port. Such functionality became extremely useful in case of limited or no physical access to the module. In an earlier post, we saw how to perform Over-The-Air Updates for an ESP8266 Using the Arduino IDE.
The option to update through the arduino IDE is intended primarily for software development phase. If the device is deployed, it might be difficult to update through the Arduino IDE. In such scenarios, we have two options:
- Update Manually with a web browser such as chrome or firefox
- Update automatically through an HTTP server
In this post we will look in updating the software over the air using a web browser.
When to web browser based Over The Air update?
Updating the software over-the-air with a web browser can be useful in the following typical scenarios:
- If loading directly from Arduino IDE is inconvenient or not possible after application deployment
- after deployment if user is unable to expose module for OTA from external update server
- Updating a small quantity of modules after deployment when setting an update server is not practicable
Requirement for web browser based OTA update:
There are only two particular requirements to be taken care of while updating the software OTA from a web browser.
- The ESP and the computer must be connected to the same network.
- Flash chip size is 2x the size of the sketch
Implementation Overview
Updates with a web browswer are implemented using ESP8266HTTPUpdateServer class together with ESP8266WebServer and ESP8266mDNS classes. We need the following code to get it work:
setup()

    MDNS.begin(host);

    httpUpdater.setup(&httpServer);
    httpServer.begin();

    MDNS.addService("http", "tcp", 80);

loop()

    httpServer.handleClient();
This code does the following:
- In the setup():
- It creates a local DNS server with the name mentioned in “host”
- Create an HTTP server
- In the loop()
- It checks for clients
So our complete code would be as follows:
Prepare and upload the initial sketch:
In this section, we will prepare the sketch and configuration for initial upload with a serial port. This initial code contains the instructions to enable the ESP to perform OTA through a web browser.
- Start Arduino IDE and load sketch WebUpdater.ino available under File > Examples > ESP8266HTTPUpdateServer.
In case you are not able to find the file, you can use this code:
#include <ESP8266WiFi.h>
#include <WiFiClient.h>
#include <ESP8266WebServer.h>
#include <ESP8266mDNS.h>
#include <ESP8266HTTPUpdateServer.h>

#ifndef STASSID
#define STASSID "your-ssid"  //Update the wifi name here
#define STAPSK  "your-password"  //Update the wifi password here
#endif

const char* host = "esp8266-webupdate";
const char* ssid = STASSID;
const char* password = STAPSK;

ESP8266WebServer httpServer(80);
ESP8266HTTPUpdateServer httpUpdater;

void setup(void) {

  Serial.begin(115200);
  Serial.println();
  Serial.println("Booting Sketch...");
  WiFi.mode(WIFI_AP_STA);
  WiFi.begin(ssid, password);

  while (WiFi.waitForConnectResult() != WL_CONNECTED) {
    WiFi.begin(ssid, password);
    Serial.println("WiFi failed, retrying.");
  }

  MDNS.begin(host);

  httpUpdater.setup(&httpServer);
  httpServer.begin();

  MDNS.addService("http", "tcp", 80);
  Serial.printf("HTTPUpdateServer ready! Open http://%s.local/update in your browser\n", host);
}

void loop(void) {
  httpServer.handleClient();
  MDNS.update();
}- Update ssid and pass in the sketch so the module can join your Wi-Fi network.
- Open File > Preferences, look for “Show verbose output during:” and check out “compilation” option.
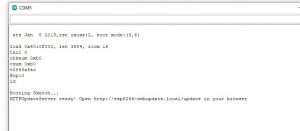
- Upload sketch (Ctrl+U). Once done open Serial Monitor (Ctrl+Shift+M) and check if you see the following message displayed, that contains url for OTA update.
Note: This message will be displayed only after module successfully joins network and is ready for an OTA upload.
Check the OTA server in web browser:
Now that we have uploaded the initial OTA code, we will open it in a browser and check if the server is running.
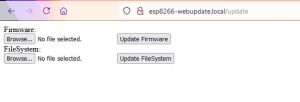
Now open web browser and enter the url provided on Serial Monitor, i.e. http://esp8266-webupdate.local/update. Once entered, browser should display a form like below that has been served by your module. The form invites you to choose a file for update. It looks like this:
If still nothing works and there are no clues on Serial Monitor, try to diagnose issue by opening provided url in Google Chrome, pressing F12 and checking contents of “Console” and “Network” tabs. Chrome provides some advanced logging on these tabs.
Check if Over The Air Update is working:
What we will do in this step is, we will upload the same code again but through the web browser. Open the same Arduino sketch from earlier and do the following:
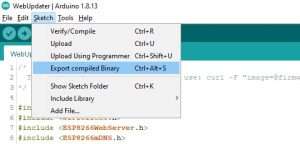
- Create the binary of the sketch. The OTA requires a binary file. Whenever you compile a sketch, a binary is created in the temp folder. However, with this step, we can create the binary in the sketch folder itself. Go to Sketch>Export compiled Binary
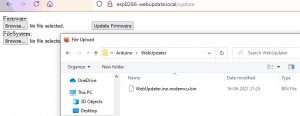
- In the web browser, below firmware, click on “Browse”. In the window that opens, navigate to the sketch folder and select the binary. Then click on “Update Firmware
- Once the update is complete, you will get “Update Success! Rebooting…” message on the web browser page. The code was uploaded successfully and the device was rebooted.
- At this point, if you have the ESP connected to the computer through serial cable, you will get the following in the serial monitor:
Just after reboot you should see exactly the same message “HTTPUpdateServer ready! Open http:// esp8266-webupdate.local /update in your browser” like earlier. This is because the module has been loaded again with the same code – first using serial port, and then using OTA.
Upload Blinky Over The Air:
Let us now use the OTA update method to update a new code. For this example, we will everyone’s favourite – “The Blinky”
Remember! we need to add the code for OTA in every sketch we upload. Otherwise, we’ll loose OTA capability and will not be able to do next uploads over-the-air. So, it’s recommended to modify the above code to include the new code.
Also remember to modify the SSID and password variables with your network credentials.
Now, coming to the code. We will add a few lines of code to the OTA code we flashed earlier. These lines are related to the blinky that we are trying to do.
//variabls for blinking an LED with Millis
const int led = D0; // ESP8266 Pin to which onboard LED is connected
unsigned long previousMillis = 0;  // will store last time LED was updated
const long interval = 1000;  // interval at which to blink (milliseconds)
int ledState = LOW;  // ledState used to set the LED
void setup()
{
   pinMode(led, OUTPUT);
And in the void loop(), we will add the following:
//loop to blink without delay
unsigned long currentMillis = millis();
if (currentMillis - previousMillis >= interval)
{
   // save the last time you blinked the LED
   previousMillis = currentMillis;
   // if the LED is off turn it on and vice-versa:
   ledState = not(ledState);
   // set the LED with the ledState of the variable:
   digitalWrite(led,  ledState);
}
So our complete new code becomes:
#include <ESP8266WiFi.h>
#include <WiFiClient.h>
#include <ESP8266WebServer.h>
#include <ESP8266mDNS.h>
#include <ESP8266HTTPUpdateServer.h>

#ifndef STASSID
#define STASSID "your-ssid" //Update the wifi name here
#define STAPSK "your-password" //Update the wifi password here
#endif

//variabls for blinking an LED with Millis
const int led = D0; // ESP8266 Pin to which onboard LED is connected
unsigned long previousMillis = 0;  // will store last time LED was updated
const long interval = 1000;  // interval at which to blink (milliseconds)
int ledState = LOW;  // ledState used to set the LED

const char* host = "esp8266-webupdate";
const char* ssid = STASSID;
const char* password = STAPSK;

ESP8266WebServer httpServer(80);
ESP8266HTTPUpdateServer httpUpdater;

void setup(void) {

  pinMode(led, OUTPUT);
  Serial.begin(115200);
  Serial.println();
  Serial.println("Booting Sketch...");
  WiFi.mode(WIFI_AP_STA);
  WiFi.begin(ssid, password);

  while (WiFi.waitForConnectResult() != WL_CONNECTED) {
    WiFi.begin(ssid, password);
    Serial.println("WiFi failed, retrying.");
  }

  MDNS.begin(host);

  httpUpdater.setup(&httpServer);
  httpServer.begin();

  MDNS.addService("http", "tcp", 80);
  Serial.printf("HTTPUpdateServer ready! Open http://%s.local/update in your browser\n", host);
}

void loop(void) {
  httpServer.handleClient();
  MDNS.update();
   unsigned long currentMillis = millis();
  if (currentMillis - previousMillis >= interval)
  {
    // save the last time you blinked the LED
    previousMillis = currentMillis;
    // if the LED is off turn it on and vice-versa:
    ledState = not(ledState);
    // set the LED with the ledState of the variable:
    digitalWrite(led,  ledState);
  }
}
With this code, follow the same steps of generating the binary file and flashing through the web browser. Within moments, your new code should upload and the blinky will be in action.
Closing Notes:
You can also add OTA routines to your own sketch following guidelines above. If done correctly, you should be always able to upload new sketch over the previous one using a web browser.
In case OTA update fails dead after entering modifications in your sketch, you can always recover module by loading it over a serial port. Then diagnose the issue with sketch using Serial Monitor. Once the issue is fixed try OTA again.
Hi, I’m Vivek, a Senior Embedded Innovation Specialist. I have been working on Embedded Systems and IoT for the past 11 years. I love to share my knowledge and train those who are interested. Nerdyelectronics.com was started out of this interest. You can read my full profile in this link.







Hi, hoping you’ll be fine. I’ve been trying to perform OTA on ESP32 but every time it restarts after i click submit. The last line before restart is: [ 21584][D][Updater.cpp:133] begin(): OTA Partition: app1
Any help in this regard would be helpful.
Thanks
Hi, hoping you’ll be fine. I’ve been trying to perform OTA on ESP32 but every time it restarts after i click submit. The last line before restart is: [ 21584][D][Updater.cpp:133] begin(): OTA Partition: app1
I’m using ESP32
Any help in this regard would be helpful.
Can you share your code and settings please?
The code I used is the one mentioned in this article. The one towards the end.