
Table of Contents
This is part 3 of the series: How to flash firmware on ESP8266. In this post, we will discuss how to flash the ESP8266 with the nodeMCU firmware. NodeMCU firmware is the most favoured firmware for the ESP particularly because it runs lua scripts. We will look into the ease of using the firmware in later posts.
As discussed earlier, we need to connect the ESP8266 as in the image shown below

- The nodeMCU flasher – you can download it here
- The ESPlorer – download here
The nodeMCU flasher is what will flash the firmware into the ESP. We will use the ESPlorer to confirm that the firmware has been loaded properly. Moreover, we will also use it to write a small lua script and send the script to the ESP.
Connecting the ESP8266 setep
As mentioned earlier, we need to have the setup connected to the computer through the USB to TTL converter. We then have to put the ESP8266 in flash mode by pulling the GPIO0 pin to ground. Once it is pulled to ground, press the reset button. Now open the nodeMCU flasher.
You will be greeted with this:
The nodeMCU Flasher
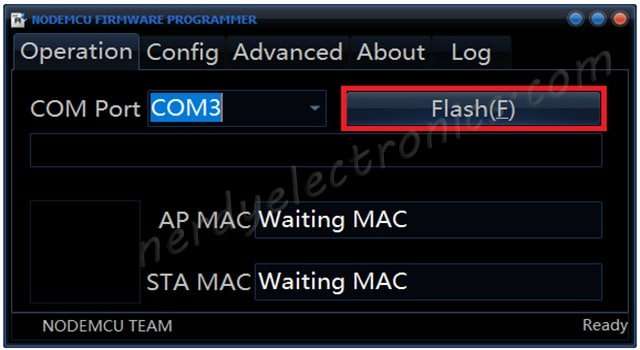
The COM port specifies the COM port to which the system is connected to the computer. You can confirm this by opening the device manager:
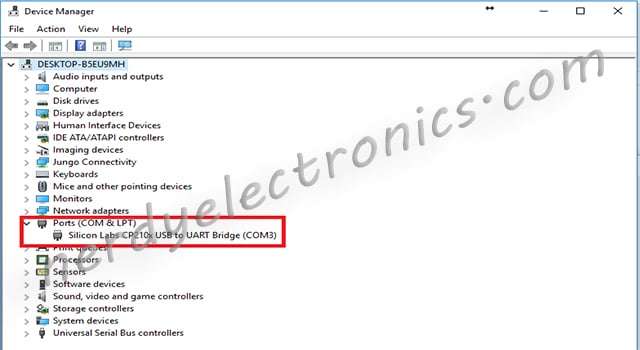
If the COM port is different from the one shown in the flasher, you can change it by clicking and typing the COM port. For example “COMx”, where x is the number of the port.
Loading the Firmware file
By default, the nodeMCU flasher comes inbuilt with the latest stable version of the nodeMCU firmware. Click on the ‘config’ tab at the top of the flasher to see this

In the red box you can see the path of the firmware. it is “INTERNAL://NODEMCU”. It is flashed at the location 0x00000. In this config page you can also select other firmware files such as the “AT commands based firmware” and flash it. You can also use it to flash any other custom built firmware.
To flash multiple firmware, you can specify the paths of each and their corresponding addresses.
Flashing the Firmware
Everything done, hit the “flash(F)” button in the “operation tab”.
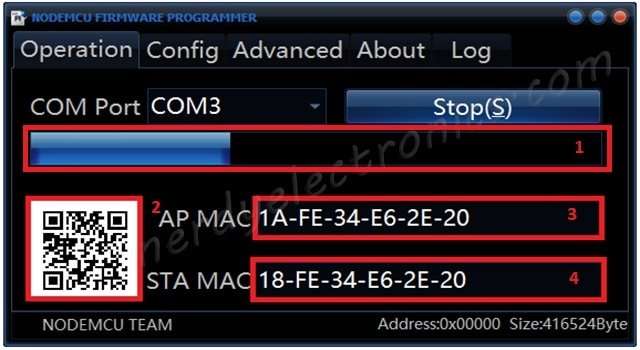
Once the flash button is pressed, the flasher tries to communicate with the ESP. The following things happen when the communication is established successfully
- The AP MAC and STA MAC of the ESP8266 are displayed (Red box 3 and 4)
- QR code of the AP MAC and STA MAC is displayed in the red box 2
- A progress bar in red box 1
When the flashing is complete, we get a green tick at the bottom of the flasher.
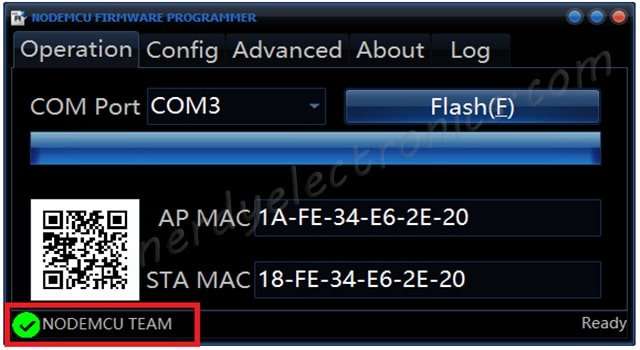
Now that we have successfully flashed the ESP, we will move ahead with the ESPlorer tool.
ESPlorer
The ESPlorer is an Integrated Development Environment (IDE) for ESP8266 development. We will be using this IDE for all our lua scripts. It also supports AT commands and python scripts.
To run the ESPlorer tool, you need to have java installed. You can download it here.
This is what the ESPlorer looks like
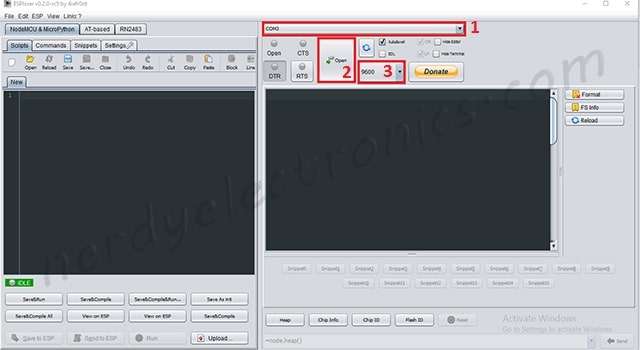
The black area on the right is like a serial terminal. All the data sent to and received from the ESP can be seen here. On the left is where you write the script. Make sure you have selected the “NodeMCU & MicroPython” tab and under that the “Scripts” tab. These two tabs are present on the top left of the ESPlorer.
In the red box 1, you enter the COM port to which the USB to TTL converter is connected. In red box 3, you set the baud rate. The default baud rate is 9600. Open the COM port by clicking “Open” in red box 2.
The ESPlorer tries to communicate with the ESP as soon as you open the COM port.
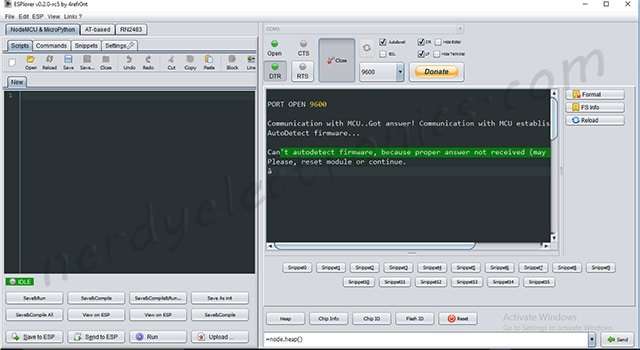
It usually fails to connect with the ESP. It seems to happen every time you open the COM port. Once you reset the ESP, the ESPlorer starts communicating
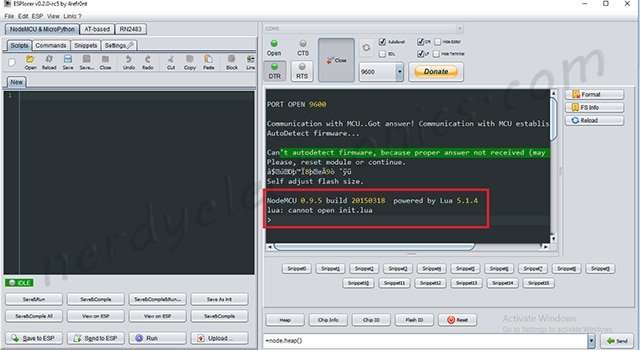
You get the following message:
NodeMCU 0.9.5 build 20150318 powered by Lua 5.1.4
lua: cannot open init.lua
0.9.5 is the firmware version. 20150318 is the date of the build. These numbers may be different depending on the firmware version and the build date.
The line “lua: cannot open init.lua” is nothing to worry about. The nodeMCU firmware is designed to execute “init.lua” file every time the ESP is powered on or reset. Since we do not have the init.lua file in the ESP, it gives out this message.
A simple lua script for the nodeMCU firmware
We will now write a simple lua script to see the working. Our lua script will contain three simple lines.
print(“Hello”)
print(“World”)
print(“Hello world – Nerdyelectronics.com”)
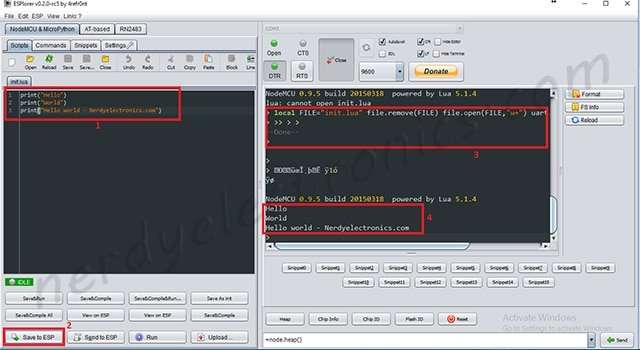
In the red box area 1 is our script. We now have to save the script before sending it to the ESP. For beginning purpose, we will save it by the name init.lua. All lua scripts have the .lua extension.
Now, click on the “Save to ESP” button at the bottom left corner. It is marked in the red box 2. ESPlorer starts sending the file to the ESP. The progress can be seen in the red box 3.
Once the sending is over, ESPlorer sends a reset command to the ESP. This is a soft reset. A soft reset is a reset initiated through software commands.
Immediately after the reset, the three lines are executed. You can see the output of the execution in the red box 4. Now every time you reset the ESP, the init.lua file is executed and you will get the same output.
This concludes the three post series of How to flash firmware on ESP8266. Next, we will see how to use the inbuilt peripherals of the ESP8266.
Stay tuned to NerdyElectronics.
Hi, I’m Vivek, a Senior Embedded Innovation Specialist. I have been working on Embedded Systems and IoT for the past 11 years. I love to share my knowledge and train those who are interested. Nerdyelectronics.com was started out of this interest. You can read my full profile in this link.


 Update in ESP8266")
 Update through Web Browser")


Hi, i really like your post. I will come back in the next few days to read more on your blog. thanks