Table of Contents
In this post, we will look into various selection criteria for sensors. Finding the right sensor can be a tough call. Hopefully by the end of this post, we would have given you some pointers to think about and make the process a bit easy.
Definition: A device that detects the changes in electrical or physical or other quantities and thereby produces an output as an acknowledgment of change within the quantity is named as a Sensor. Generally, the sensor output is going to be electrical or optical signal.
Finding the right sensor can be a tough call. Hopefully by the end of this post, we would have given you some pointers to think about and make the process a bit easy.
High Level Selection Criteria for Sensors:
A sensor is usually not good or bad on it’s own. It totally depends on the application. To give you an idea, a sensor with 10-bit resolution could be a good fit for an application whereas another one with 16-bit resolution could be overkill.
At a high level, the selection criteria for sensors involve two steps:
Suitable Candidates:
Narrowing down the search list of sensors (typically to 2-3). In this step, you consider all parameter and select a few sensors that suit your requirements.
Testing the shortlisted sensors
Testing the sensors in an environment similar to the application setup, so that we can analyze the sensors accordingly.
Selection criteria for sensors
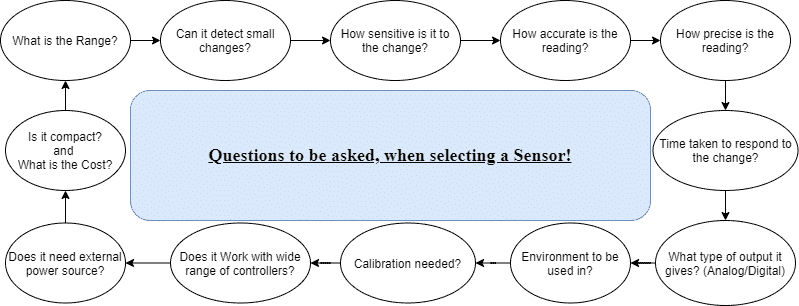
So while comparing the Sensor, consider the following parameters:
1. Range:
Difference between Maximum and Minimum value which can be sensed by the sensor. What is the minimum value you need to sense? What is the maximum value you need to sense?
2. Resolution:
The smallest change which can be sensed by the sensor. High is good but not always. If it is too high, it would pickup even very minute fluctuations which would then require additional processing.
3. Sensitivity:
Ratio of change in output to a unit change in the input. Again, high is good, but too high could be a problem. Also, higher the sensitivity, more will be the cost in most cases.
4. Error:
Difference between the Measured Value and True Value. You want this value to be low. All sensors have a margin of error. Does you application allow you to have that margin of error?
5. Accuracy:
It is inversely proportional to Error, i.e. How close the sensor reading is to the True Value. (Should be high).
6. Precision:
Ability to give/reproduce accurate value repeatedly. If a sensor is giving different values for the same physical conditions, it is not a good choice.
7. Response Time:
Time lag between the Input and Output. (Should be Minimum)
8. Signal-to-noise Ratio:
Ratio between the magnitude of the signal and the noise at the output.
9. Calibration:
As sensors need frequent calibration, so it should be easy to calibrate.
10. Cost:
It shouldn’t be expensive.
11. Nature of Output:
Do we need Analog output or Digital output, it should be clear.
12. Environment:
It is one of the most important parameters because not all sensors can work in extreme conditions. Sensors can get affected due to the non-ideal conditions(like temperature, humidity, etc.) which may affect the output of the sensor.
13. Flexibility:
We check whether the sensor can adapt to changes in the product with a simple OTA.
14. Interfacing:
It should be compatible to use with a wide range of instruments.
Some sensors need an external power source to produce an output, so it important to provide the power source, so that additional errors aren’t introduced.
15. Size and Weight:
Sensors should be compact and lightweight.
Select a Sensor – Example:
Lets see, how we will be using the above points in choosing the correct temperature sensor for our application.
Application to be used in: In a home setup, where I have to check the temperature, so we will be comparing LM35 and DHT11 here. Let’s have a quick comparison on the basis of the above points.
LM35 is an analog temperature sensor used to measure the temperature with an electrical output which is proportional to the temperature(in °C). The range of operation is -55°C to 150°C. As the scale factor is 0.01V/°C so if my temperature is 27°C, then the voltage obtained will be 0.27V. It doesn’t require external calibration and maintains an accuracy of ±0.4°C for room temperature and ±0.8°C over a range of 0°C to 100°C. It has Low Self-Heating(0.08°C), which doesn’t affect the reading.
DHT11 is a digital temperature and humidity sensor. You can learn more about DHT11 and DHT22 sensors and its working in the below mentioned post:
The range of operation is 0°C to 50°C with ±2°C accuracy for temperature sensing and 20 to 80% with 5% accuracy for humidity sensing. The sampling rate is 1Hz(i.e. Give one reading for every second).
Here as we can see, LM35 has a wider range of operations than DHT11, but as we are will be using it in a home setup, where our maximum temperature can go till 45°C, both of them can be used.
But for more accurate results, we can choose LM35. But we wish to even monitor humidity with temperature, then DHT11 is a better choice.

Kunal is a keen learner who is exploring the domain of Embedded Systems and IoT. He is passionate about learning new technologies and sharing it with whoever is interested.




Well written
Great read!!
Need thermopile sensor