Table of Contents
LM35 is a temperature sensor that outputs an analog signal which is proportional to the instantaneous temperature. The output voltage can easily be interpreted to obtain a temperature reading in Celsius. The advantage of lm35 over thermistor is it does not require any external calibration. The coating also protects it from self-heating. Low cost (approximately Rs. 70) and greater accuracy make it popular among hobbyists, DIY circuit makers, and students.
Many low-end products take advantage of low cost, greater accuracy and used LM35 in their products. Its approximately 15+ years to its first release but the sensor is still surviving and is used in any products.
LM35 Temperature sensor Features
- Calibrated Directly in Celsius (Centigrade)
- Linear + 10-mV/°C Scale Factor
- 0.5°C Ensured Accuracy (at 25°C)
- Rated for Full −55°C to 150°C Range
- Suitable for Remote Applications
- Operates from 4 V to 30 V
- Less than 60-µA Current Drain
- Low Self-Heating, 0.08°C in Still Air
- Non-Linearity Only ±¼°C Typical
- Low-Impedance Output, 0.1 Ω for 1-mA Load
LM35 Pin-Out:
The LM35 consists of only three pins. The pin-out is as follows:
LM35 Working Principle (LM35 output):
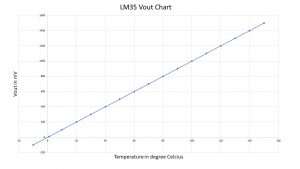
Linear + 10-mV/°C Scale Factor
| Temperature (in °C) | Vout (in mv) |
| -10 | -100 |
| 1 | 10 |
| 10 | 100 |
| 20 | 200 |
| 30 | 300 |
| 90 | 900 |
| 150 | 1500 |
LM35 Temperature Sensor Circuit Configuration
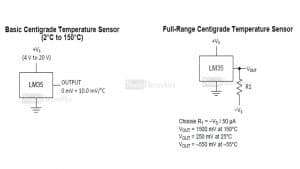
LM35 can be used in two circuit configurations. Both yield different results.
In the first configuration, you can only measure the positive temperature from 2 degrees Celsius to 150 degrees Celsius. For this configuration, we simply power lm35 and connect the output directly to analog to digital converters.
In the second configuration, we can utilize all the sensor resources and can measure the full range temperature from -55 degree centigrade to 150-degree centigrade. This configuration is a little complex but yields better results. We have to connect an external resistor, in this case, to switch the level of negative voltage upwards. The external resistor value can be calculated from the formula given below the configuration circuit.
The second configuration circuit can be made in various ways.To see about the second configuration circuits visit the LM35 datasheet by Texas Instruments. Texas Instruments data sheet enlists the circuit with clear component values.
Steps to calculate temperature using LM35 temperature sensor
- Build circuit.
- Power LM35 vcc to +5-20 volts and gnd to ground.
- Connect Vout to analog to digital converter input.
- Sample the ADC reading, vout output voltage.
- Convert the voltage to temperature.
Formula to convert voltage to temperature
The formula to convert the voltage to centigrade temperature for LM35 is
Centigrade Temperature = Voltage Read by ADC / 10 mV(mills Volt)
I divided by 10 mV because Linear scale factor is for LM35 is 10mV. Following the above steps and tutorial, you can easily interface LM35 temperature sensor with any microcontroller that has a built-in analog to digital converter pins. Almost all the microcontrollers today have built-in ADC.
For a demonstration and an example, I will use Arduino and show you how to interface LM35 with an Arduino
LM35 with Arduino:
For this tutorial we need an arduino board(Uno, Maga, Lenardo etc) and Lm35 temperature sensor. I am using Arduino Uno. What we will do is:
- Make the Circuit
- Read the Temperature Sensor Output
- Convert the ADC Value to equivalent temparature
- Display the data in serial monitor
Let’s get started:
1) Make the Circuit
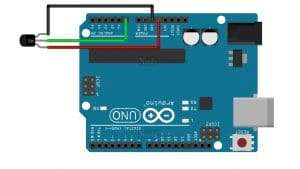
| LM35 | Arduino |
| Pin 1 – Vcc | 5v |
| Pin2 – Vout | A0 |
| Pin3 – Gnd | Gnd |
2) Read the Temperature Sensor Output
To read the sensor output, we will simply call the analogRead() function in Arduino. To this function, we need to pass the ADC channel value, or A0 in our case. A0 is the pin to which the sensor output pin is connected. We will store the result in a variable named ADCValue.
float ADCValue;
ADCValue = analogRead(A0);
3) Convert the ADC Value to equivalent temparature
Now that we have the ADC value in a variable, we have to do two things:
- Convert the ADC Value to equivalent voltage
- Convert the voltage to temperature reading
For the first step, we have to divide the ADCValue with the maximum possible value of the ADC. The Arduino ADC is a 10-bit ADC. So, the maximum value can be (2^10-1) = 1023. We subtract 1 because the count starts from zero. We get the value of ADC as 1023 if the voltage is 5v.
The calculation follows simple unitary method:
If the value is 1023, the voltage = 5
If the value is 1, the voltage = (5/1023)
If the value is ADCValue, the voltage is = (5/1023)*ADCValue
In Arduino, we write this as follows:
float tempVoltage = 0;

tempVoltage = (5/1023)*ADCValue;
Example: if the temperature is 30 degrees, the sensor output will be 300 mV. This will give an ADCValue = 61
Converting this value to voltage = (5/1023)*61 = 0.298V
Since our sensor output is in mV, we will multiply the entire value with 1000 to convert from voltage to milliVolts. So, our new statement becomes:
tempVoltage = ((5/1023)*ADCValue)*1000; //sensor output in milli volts
Now that we have the voltage of the sensor, we need to convert it to equivalent temperature. Remember, we saw earlier that the scaling factor of LM35 is 10mV/degree Celcius? That is, For every degree celcius of the temperature, the sensor output is 10 mV.
So, if we have the mV reading of the sensor and divide it by 10, the new value will be our temperature. Let’s do that:
float temperature = 0;

temperature = tempVoltage/10; //temperature in Celcius
4) Display the data in serial monitor
We will now display this calculated temperature in the serial monitor:
Serial.print("Temperature = ");
Serial.println(temperature);
LM35 with Arduino – Full Code:
Combining all the above knowledge together, we have a small code that can give us the temperature
//Arduino code to read temperature from LM35 Temperature Sensor
// by Nerdyelectronics.com

void setup()
{
    Serial.begin(9600); //initialize serial communication with 9600 baud rate
}

void loop()
{
    float ADCValue;
    float tempVoltage = 0;
    float temperature = 0;

    ADCValue = analogRead(A0);
    tempVoltage = ((5/1023)*ADCValue)*1000; //sensor output in milli volts
    temperature = tempVoltage/10; //temperature in Celcius

    Serial.print("Temperature = ");
    Serial.println(temperature);

    delay(5000); //We will check the temperature every 5 seconds
}
That’s all about LM35 and how to use it for monitoring the temperature. As an upgrade, you can think about sending the temperature value to the cloud. This post explains in details how to send sensor data to the cloud. In the example in the post, I have used LM35 to read the temperature and then send it to cloud.
Hi, I’m Vivek, a Senior Embedded Innovation Specialist. I have been working on Embedded Systems and IoT for the past 11 years. I love to share my knowledge and train those who are interested. Nerdyelectronics.com was started out of this interest. You can read my full profile in this link.

