Table of Contents
Imagine a relay that has to be activated at a certain time or a data logger that has to store values at precise intervals. Let’s say you want to measure the temperature of a room and monitor what the temperature was at any given time. In such projects keeping time is a prime concern. If your ESP8266 project has access to the Internet, you can get time using Network Time Protocol (NTP) – without any additional hardware. In this tutorial we’ll see how to get time from Internet using the ESP8266/nodemcu with Arduino IDE by using the NTP.
There is, of course, the possibility of using an RTC (Real Time Clock) chip. But these chips are not perfectly accurate so, you need to do manual adjustments over and over again to keep them synchronized.
What is an NTP (the protocol to get Time from Internet)?
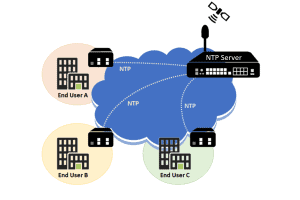
An NTP stands for Network Time Protocol. It is a networking protocol for clock synchronization between computer systems. In other words, it is used to synchronize computer clock times in a network.
The protocol can be used to synchronize all networked devices to Coordinated Universal Time (UTC) within a few milliseconds ( 50 milliseconds over the public Internet and under 5 milliseconds in a LAN environment).
Coordinated Universal Time (UTC) is a world-wide time standard, closely related to GMT (Greenwich Mean Time). UTC does not vary, it is the same world wide.
NTP sets the clocks of computers to UTC, any local time zone offset or day light saving time offset is applied by the client. In this manner clients can synchronize to servers regardless of location and time zone differences.
NTP Architecture
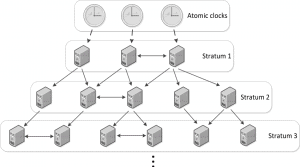
NTP uses a hierarchical architecture. Each level in the hierarchy is known as a stratum.
At the very top of the hierarchy are high-precision timekeeping devices, such as atomic clocks, GPS or radio clocks, known as stratum 0 hardware clocks. These are called Stratum 0.
Stratum 1 servers have a direct connection to a stratum 0 hardware clock and therefore have the most accurate time.
Working of NTP?
The most common configuration for NTP is to operate in client-server mode. The basic working principle is as follows:
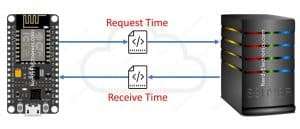
- A client device such as ESP8266 connects to the server using the User Datagram Protocol (UDP) on port 123.
- The client then transmits a request packet to a NTP server.
- In response to this request the NTP server sends a time stamp packet.
- A time stamp packet contains multiple information like UNIX timestamp, accuracy, delay or timezone.
- A client can then parse out current date & time values.
The timestamp sent by the NTP server is in Coordinated Universal Time (UTC) within a few milliseconds.
The client can then add any local time zone offset or day light saving time offset to this received UTC time. In this manner clients can synchronize to servers regardless of location and time zone differences.
Prerequisites: Arduino IDE and ESP8266 Boards
We will be using the Arduino IDE to program the NodeMCU board. As a prerequisite to this tutorial, you need to have the Arduino IDE and the ESP8266 boards installed. if not already installed, the following tutorial will help you install it.
Now that you have the prerequisites satisfied, let us first understand what NTP is. Then we will move on to the implementation.
Installing the NTP Library in Arduino
Now that we have a solid understanding of what NTP is and how it works, we are ready to move on to the implementation. The best, fastest and the easiest way is to install the NTP library in Arduino. To do that, follow these steps:
- Navigate to the Sketch > Include Library > Manage Libraries…
- Wait for Library Manager to download libraries index and update list of installed libraries.
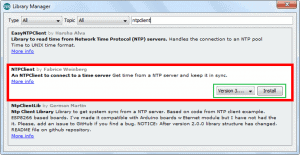
- Filter your search by typing ‘ntpclient’. There should be a couple entries. Look for NTPClient by Fabrice Weinberg.
- Click on that entry, and then select Install.
NTPClient Library Time Functions
The NTPClient Library comes with the following functions to return time:
getDay() – returns an int number that corresponds to the the week day (0 to 6) starting on Sunday;
getHours() – returns an int number with the current hour (0 to 23) in 24 hour format;
getMinutes() – returns an int number with the current minutes (0 to 59);
getSeconds() – returns an int number with the current second;
getEpochTime() – returns an unsigned long with the epoch time (number of seconds that have elapsed since January 1, 1970 (midnight GMT);
getFormattedTime() – returns a String with the time formatted like HH:MM:SS;
This library doesn’t come with functions to return the date, but we’ll show you in the code how to get the date (day, month and year).
Getting Current Day and Time from NTP Server
The following sketch will give you complete understanding on how to get current day and time from the NTP Server.
Before you head for uploading the sketch, you need to make some changes to make it work for you.
Add Network Credentials
You need to modify the following two variables with your network credentials, so that ESP8266 can establish a connection with existing network.
const char* ssid       = "YOUR_SSID";
const char* password   = "YOUR_PASS";
Update the Offset
You need to adjust the UTC offset for your timezone in seconds. Refer the list of UTC time offsets. Here are some examples for different time zones:
- For UTC -5.00 : -5 * 60 * 60 : -18000
- For UTC +1.00 : 1 * 60 * 60 : 3600
- For UTC +0.00 : 0 * 60 * 60 : 0
In India, the offset is UTC+5.30. Therefore the offset in terms of seconds is (5*60 +30)*60 seconds = 19800 seconds
timeClient.setTimeOffset(19800); //IST is UTC+5:30 Hrs
The Code
#include <ESP8266WiFi.h>
#include <NTPClient.h>
#include <WiFiUdp.h>

// Replace with your network credentials
const char *ssid     = "XXXXX";
const char *password = "XXXXXXXXXXXXXXX";

// Define NTP Client to get time
WiFiUDP ntpUDP;
NTPClient timeClient(ntpUDP, "pool.ntp.org");

//Week Days
String weekDays[7]={"Sunday", "Monday", "Tuesday", "Wednesday", "Thursday", "Friday", "Saturday"};

//Month names
String months[12]={"January", "February", "March", "April", "May", "June", "July", "August", "September", "October", "November", "December"};

void setup() {
  // Initialize Serial Monitor
  Serial.begin(115200);

  // Connect to Wi-Fi
  Serial.print("Connecting to ");
  Serial.println(ssid);
  WiFi.begin(ssid, password);
  while (WiFi.status() != WL_CONNECTED) {
    delay(500);
    Serial.print(".");
  }

// Initialize a NTPClient to get time
  timeClient.begin();
  // Set offset time in seconds to adjust for your timezone, for example:
  // GMT +1 = 3600
  // GMT +8 = 28800
  // GMT -1 = -3600
  // GMT 0 = 0
  timeClient.setTimeOffset(19800);  //IST is UTC+5:30 Hrs
}

void loop() {
  timeClient.update();

  unsigned long epochTime = timeClient.getEpochTime();
  Serial.print("Epoch Time: ");
  Serial.println(epochTime);

  String formattedTime = timeClient.getFormattedTime();
  Serial.print("Formatted Time: ");
  Serial.println(formattedTime);

  int currentHour = timeClient.getHours();
  Serial.print("Hour: ");
  Serial.println(currentHour);

  int currentMinute = timeClient.getMinutes();
  Serial.print("Minutes: ");
  Serial.println(currentMinute);

  int currentSecond = timeClient.getSeconds();
  Serial.print("Seconds: ");
  Serial.println(currentSecond);

  String weekDay = weekDays[timeClient.getDay()];
  Serial.print("Week Day: ");
  Serial.println(weekDay);

  //Get a time structure
  struct tm *ptm = gmtime ((time_t *)&epochTime);

  int monthDay = ptm->tm_mday;
  Serial.print("Month day: ");
  Serial.println(monthDay);

  int currentMonth = ptm->tm_mon+1;
  Serial.print("Month: ");
  Serial.println(currentMonth);

  String currentMonthName = months[currentMonth-1];
  Serial.print("Month name: ");
  Serial.println(currentMonthName);

  int currentYear = ptm->tm_year+1900;
  Serial.print("Year: ");
  Serial.println(currentYear);

  //Print complete date:
  String currentDate = String(currentYear) + "-" + String(currentMonth) + "-" + String(monthDay);
  Serial.print("Current date: ");
  Serial.println(currentDate);

  Serial.println("");

  delay(2000);
}
Code Working
Include the necessary Libraries.
#include <ESP8266WiFi.h>
#include <NTPClient.h>
#include <WiFiUdp.h>
Insert Network Credentials
- Insert your network credentials in the following variables so that the ESP8266 can connect to your router to have access to the internet to request date and time from the NTP server.
const char *ssid = "XXXXX";
const char *password = "XXXXXXXXXXXXXXX";
Define an NTP client to get date and time from Internet
We’ll request the time from pool.ntp.org, which is a cluster of times servers that anyone can use to request the time. The pool.ntp.org automatically picks time servers which are geographically close for you. But if you want to choose explicitly, use one of the sub-zones of pool.ntp.org.
| Area | HostName |
| Worldwide | pool.ntp.org |
| Asia | asia.pool.ntp.org |
| Europe | europe.pool.ntp.org |
| North America | north-america.pool.ntp.org |
| Oceania | oceania.pool.ntp.org |
| South America | south-america.pool.ntp.org |
WiFiUDP ntpUDP;
NTPClient timeClient(ntpUDP, "pool.ntp.org");
Arrays to hold the Day and Month Names
Next, we create two arrays to hold the days of the week and the month names.
//Week Days
String weekDays[7]={"Sunday", "Monday", "Tuesday", "Wednesday", "Thursday", "Friday", "Saturday"};
//Month names
String months[12]={"January", "February", "March", "April", "May", "June", "July", "August", "September", "October", "November", "December"};
setup()
The setup() function in Arduino is used to write the part of code which we want to run only once at the beginning. In this function, we usually do the initializations.
Initialize Serial Monitor
In the setup(), initialize the Serial Monitor to display the information.
Serial.begin(115200);
Connect the ESP8266 to the internet.
// Connect to Wi-Fi
Serial.print("Connecting to ");
Serial.println(ssid);
WiFi.begin(ssid, password);
while (WiFi.status() != WL_CONNECTED) {
   delay(500);
   Serial.print(".");
}
Initialize the NTPClient
The begin() function is used to initialize the timeClient.
timeClient.begin();
Set Timezone
You can use the setTimeOffset() method to adjust the time for your timezone in seconds.
timeClient.setTimeOffset(19800);
Here are some examples for different time zones:
- GMT +1 = 3600
- GMT +8 = 28800
- GMT -1 = -3600
- GMT 0 = 0
In India, the offset is UTC+5.30. Therefore the offset in terms of seconds is (5*60 +30)*60 seconds = 19800 seconds
timeClient.setTimeOffset(19800); //IST is UTC+5:30 Hrs
loop()
Update
In the loop(), call the update() function to get the current date and time from the NTP server.
timeClient.update();
Get Time
Then, we can use the functions provided by the library to get time.
- To get the epoch time:
unsigned long epochTime = timeClient.getEpochTime();
Serial.print("Epoch Time: ");
Serial.println(epochTime);
- The getFormattedTime()function returns the time in HH:MM:SS format.
String formattedTime = timeClient.getFormattedTime();
Serial.print("Formatted Time: ");
Serial.println(formattedTime);
You can get the hours, minutes or seconds separately using the getHours(), getMinutes() and getSeconds()functions as follows:
int currentHour = timeClient.getHours();
Serial.print("Hour: ");
Serial.println(currentHour);

int currentMinute = timeClient.getMinutes();
Serial.print("Minutes: ");
Serial.println(currentMinute);

int currentSecond = timeClient.getSeconds();
Serial.print("Seconds: ");
Serial.println(currentSecond);
Get Date
- The getDay() function returns a number from 0 to 6, in which 0 corresponds to Sunday and 6 to Saturday. So, we can access the week day name from the array we’ve created previously as follows
String weekDay = weekDays[timeClient.getDay()];
Serial.print("Week Day: ");
Serial.println(weekDay);
- The NTP Client doesn’t come with functions to get the date. So, we need to create a time structure (struct tm) and then, access its elements to get information about the date.
struct tm *ptm = gmtime ((time_t *)&epochTime);
The time structure contains the following elements:
tm_sec: seconds after the minute;tm_min: minutes after the hour;tm_hour: hours since midnight;tm_mday: day of the month;tm_year: years since 1900;tm_wday: days since Sunday;tm_yday: days since January 1;tm_isdst: Daylight Saving Time flag;- tm structure documentation.
- The following lines get the day of the month as follows:
int monthDay = ptm->tm_mday;
Serial.print("Month day: ");
Serial.println(monthDay);
- To get the other elements, you use a similar approach. For example, for the month:
int currentMonth = ptm->tm_mon+1;
Serial.print("Month: ");
Serial.println(currentMonth);
Because the tm_mdaystarts at 0, we add 1 to the month so that January corresponds to 1, February to 2, and so on.
- Then, we can get the name of the month using the months array we’ve created previously. The arrays numbering starts at 0, that’s why we subtract 1.
String currentMonthName = months[currentMonth-1];
Serial.print("Month name: ");
Serial.println(currentMonthName);
- To get the year, we need to add 1900 because the tm_yearsaves the number of years after 1900.
int currentYear = ptm->tm_year+1900;
Serial.print("Year: ");
Serial.println(currentYear);- Finally, we create a String called currentDate that holds the current date in the YYYY-MM-DD format.
String currentDate = String(currentYear) + "-" + String(currentMonth) + "-" + String(monthDay);
Serial.print("Current date: ");
Serial.println(currentDate);
Have you used NTP in your projects? What was your ecperience? Do let me know your thoughts in the comments.
Hi, I’m Vivek, a Senior Embedded Innovation Specialist. I have been working on Embedded Systems and IoT for the past 11 years. I love to share my knowledge and train those who are interested. Nerdyelectronics.com was started out of this interest. You can read my full profile in this link.




**Hi
** using original UTC+5.30 Hrs **
Epoch Time: 1679132252
Formatted Time: 09:37:32
Hour: 9
Minutes: 37
Seconds: 32
Week Day: Saturday
Month day: 22
Month: 12
Month name: December
Year: -2148883
Current date: -2148883-12-22
** time and Day for India but Year Month and Date are wrong**
** Set my local UTC+11 HRS correct, but Yr/Mth/Dt still wrong **
Epoch Time: 1679152239
Formatted Time: 15:10:39
Hour: 15
Minutes: 10
Seconds: 39
Week Day: Saturday
Month day: 22
Month: 12
Month name: December
Year: -2148883
Current date: -2148883-12-22
** Any updates to sketch Please ? **
Hello Patrick
It’s been a while since I have worked on this application. Let me do it again and get back to you
Checking epochtime calculator at site
https://epochtimestamp.com/
The calulator gets it right for ms (14 digits) but for secs (10 digits it gets messed up.
could this be the problem ?
** note ** Teminal printout of NTP app
Epoch Time: 1679305004
Formatted Time: 09:36:44
Hour: 9
Minutes: 36
Seconds: 44
Week Day: Monday
Month day: 14
Month: 2
Month name: February
Year: -3069529
Current date: -3069529-2-14
** notes **
The printed Epoch time is incorrect
The printed formatted time is correct from a realtime reading
Which would have been 1679265404
The month year and date is calculated from the incorrect Epoch time
readingd can be formulated by EXCEL get and compare
from https://epochtimestamp.com/ Use Excel tabel below
Use formula show in B colum and paste int A colum
You local offset = UTC ofset hours x 120
A1 B1
1679265404 10 digits
1679305004 add local 39600 AU offset =A1+39600
19436.4005 divide by 86400 =A2/86400
45005.4005 add 25569 =A3+25569
** format these cells for date and times
20/03/2023 date =A4
09:36:44 time =A4
9:36:44 AM am/pm =A4
A1 ———– B1 Hope this looks better
1679265404—– 10 digits
1679305004—– add local 39600AU offset =A1+39600
19436.4005—– divide by 86400 =A2/86400
45005.4005——add 25569 =A3+25569
** format these cells for date and times
20/03/2023—— date =A4
09:36:44——- time =A4
9:36:44 AM am/pm =A4
Hope this looks better
A1 ———– B1
1679265404—– 10 digits
1679305004—– add local 39600AU offset =A1+39600
19436.4005—– divide by 86400 =A2/86400
45005.4005——add 25569 =A3+25569
** format these cells for date and times
20/03/2023—— date =A4
09:36:44——- time =A4
9:36:44 AM am/pm =A4