Table of Contents
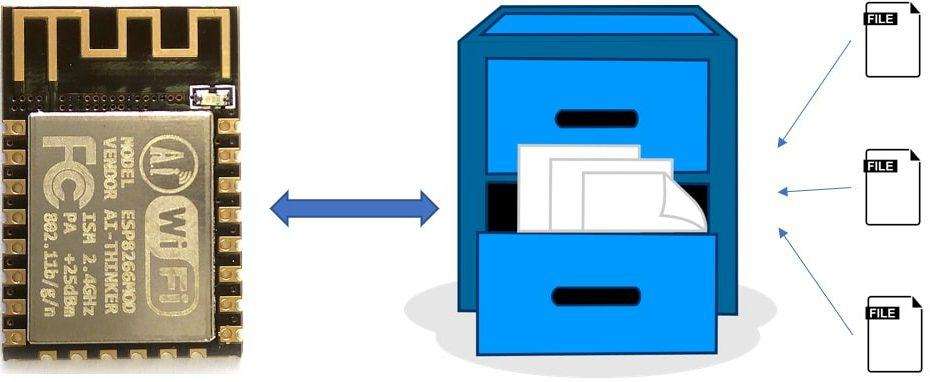
Did you know each ESP8266 allows you to partition the system flash such that you can use it to store both code and support a file system? This filing system can be used to store infrequently changing data such as; web pages, configurations, sensor calibration data, certificates, etc. We can then read the files from the ESP8266 SPIFFS file system in our program
In this article, you will learn NodeMCU or ESP8266 Flash File System Called as (SPIFFS). There are two methods to save static data on NodeMCU.
- Internal EEPROM – 512 Bytes. You can write data 1 million times (but it has no file system).
- Flash memory – connected to ESP through SPI. In this flash memory, ESP stores the program, files, WiFi, and configurations. Limitation of this memory is it has only 10000 write cycles. Even though the file system is stored in the same flash chip as the program, programming new sketch will not modify file system contents. This allows using the file system to store sketch data, configuration files, or content for the Web server, etc..
ESP8266 SPIFFS available Functions
Let us first have a look at the various functions available for use.
SPIFFS.begin
This method initializes or mounts the SPIFFS file system. We call this function before using other functions from this package. Returns true if the file system was mounted successfully, false otherwise.
Syntax: SPIFFS.begin()
Returns:
1 – Mounted Successfully
0 – Mount unsuccessful
Code Snippet:
  if (!SPIFFS.begin())
  {
    Serial.println("Failed to mount file system");
    return;
  }
So, we call this function and check for the return value.
SPIFFS.open
This function opens the desired file. The path should be specified starting with a slash.(eg: /data.txt).
Mode is a string which indicates the file privilege. It can be:
- “r”-reads the file,
- “w”-Writes to the file,
- “a”-adds or appends data to file,
- Few other modes like “r+”, “w+”, “a+”
Returns File object. We use the Boolean operator to check if the file was opened successfully. If the file object is NULL, it means the file was not opened successfully
Syntax: SPIFFS.open(path,mode)
Returns:
File Object – If Open Successful
0 (zero) – If Open unsuccessful
Code snippet:
  File configurations = SPIFFS.open("/config.txt", "r"); //Enter the file name
  if (!configurations)
  {
    Serial.println("Failed to config file");

  }
  else
  {
     //File successfully opened
     //enter your logic here
  }
SPIFFS.remove
Deletes the file specified using path. Returns true if the file is deleted Successfully.
Syntax: SPIFFS.remove(path)
Returns:
1 (True) – If delete Successful
0 (False) – If delete unsuccessful
Code snippet:
  uint8_t removeFile = SPIFFS.remove("/config.txt", "r"); //Enter the file name
  if (!removeFile)
  {
    Serial.println("Failed to remove config file");

  }
  else
  {
     Serial.println("config file removed successfully");
  }
File.size
Returns file size, in bytes.
Syntax: file.size()
Code snippet:
  File configurations= SPIFFS.open("/config.txt", "r"); //Enter the file name
  if (!configurations)
  {
    Serial.println("Failed to open config file");

  }
  else
  {
     Serial.print("Size of config file = ");
     Serial.println(configurations.size());
  }
File.close
Closes the file. No other operation will be performed on File object after the close function called.
Syntax: file.close()
Code Snippet:
  File configurations= SPIFFS.open("/config.txt", "r"); //Enter the file name
  if (!configurations)
  {
    Serial.println("Failed to open config file");

  }
  else
  {
     //Write your logic here
     //Now close the file
     configurations.close();
  }
Now you have understood the methods available in SPIFFS and how to use them in program. In the program, we will read a file from the ESP8266 SPIFFS file system and display the content on the serial monitor.
For this tutorial, I will use a text file called “config.txt“. Inside this file, I have written the following:
To upload the file to NodeMCU, we will use the ESP8266 sketch data upload tool.
If you have not installed it, read about the ESP8266 SPIFFS sketch data upload tool, how to install it and how to upload files. In the linked post, I have discussed about this tool and also some common issues you might face
Let us now dive into the program.
ESP8266 NodeMCU SPIFFS Program:
This program shows the use of the SPIFFS function calls and how to read and display the information from the config file:
The working of the program is:
- Mount the SPIFFS File System
- Open the config file
- Read the config file and print the information
- Close the file
/****************************************************************
 * NodeMCU SPIFFS Tutorial Example
 *
 * Example program to read file from SPIFFS in ESP8266
 * by https://nerdyelectronics.com
 *
 * The ESP8266 SPIFFS File System – Complete Beginner Guide:
 * https://nerdyelectronics.com/iot/esp8266/esp8266-spiffs-file-system/
 *
 * Upload Files to ESP8266 SPIFFS:
 * https://nerdyelectronics.com/iot/esp8266/upload-files-to-esp8266-spiffs/
 *
 ***************************************************************/

#include "FS.h"

void setup() {
  // put your setup code here, to run once:
  Serial.begin(9600);
  if (!SPIFFS.begin()) //mount the file system
  {
    Serial.println("Failed to mount file system");
    return;
  }

}

void loop() {
  // put your main code here, to run repeatedly:


  File configurations = SPIFFS.open("/config.txt", "r"); //open the config file
  if (!configurations)
  {
    Serial.println("Failed to open config file");

  }
  else
  {
    Serial.println("Successfully opened config file");
    Serial.print("File size = ");
    Serial.println(configurations.size());  //read the file size here
    while (configurations.available())
    {
      Serial.write(configurations.read());
    }
    Serial.println("");
  }
  configurations.close();
  delay(5000);
}
You can download the same program and the “config.txt” file from this link.
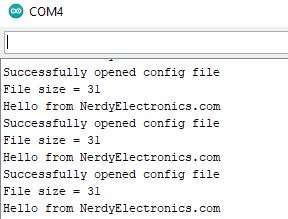
Now, upload this program to the NodeMCU and open the Serial Monitor. You should see an output like this:

Congratulations!! You have successfully made use of the SPIFFS file system to open and read files. In the next post we will see the benefits of this method.
Do let me know in the comments your thoughts.
Hi, I’m Vivek, a Senior Embedded Innovation Specialist. I have been working on Embedded Systems and IoT for the past 11 years. I love to share my knowledge and train those who are interested. Nerdyelectronics.com was started out of this interest. You can read my full profile in this link.


